We all might try to pretend that the code we wrote is perfect and will never break, but if there is one constant in Software Development it is that no matter how genius you were when you wrote your code, you are bound to run into bugs. As every developer is all too aware, debugging can present a real challenge, particularly when the code must be executed from within a specialized environment remote from the developers own computer.
As .NET developers we have transitioned our model to a Cloud First mentality which is to say that all of our processes must work in the cloud including the ability to debug our code. When I found myself suddenly needing to reach out to the Cloud as any developer would I began researching what options were available. It didn’t take long for me to find out that Visual Studio offers free Remote Tools. Unfortunately every article I read seemed to be either out of date or leave just enough information out that it ultimately led me in circles.
From vNow to vNext, .NET provides one of the friendliest environments for working Cloud First once you understand the tools at your disposal. Regardless of what type of .NET application you have deployed on your Windows Cloud Server, Visual Studio provides you with an easy out of box solution for securely connecting to your live code in the Cloud. While every development situation is a little different, one of the common one’s that I see today is for the Web App Developer. With that in mind here’s a simple guide to go from a fresh Cloud Server to a Web Server that you as a developer can fully utilize to debug your code.
Checklist:
- Microsoft Windows Server running Server 2008 or later
- Add any Local or Domain Users and Groups that should have access to the Remote Debugging Tools to the Local Administrators Group
Step 1:
- Perhaps this should go without saying, but Install the Web Server (IIS) Role. This can be done manually or by using either Web Platform Installer or the included script.
Step 2:
- Install Web Deploy 3.5 if you want to deploy your solution directly from within Visual Studio. This should be done from within Web Platform Installer or the included script.
Cheat:
- OR -
- Install Web Platform Installer.
- Install the following packages:
- Recommended IIS Configuration ( Step 1 )
- Web Deploy 3.5 ( Step 2 )
- OR -
- Recommended IIS Configuration for Hosting Providers ( Steps 1 & 2 )
- This includes Web Deploy, PHP 5.3, PHP 5.5, and Node.JS
You should also verify that all of the Features of the Web Server you want are installed.
Step 3:
Download and Install the Remote Tools for the version of Visual Studio you have installed and will be using. The installation process is extremely simple, simply agree to the license and click Install.
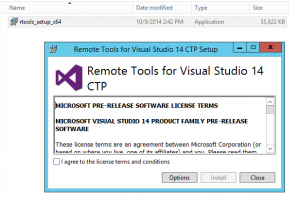
The installer has the same easy flow for vNow to vNext.
Agree to the Terms and Conditions and click Install.
Following the installation you will need to open the Remote Debugger Configuration Wizard from the Start menu. Since it just seems like a bad practice to leave your server open to anyone to be able to connect to the processes, my suggestion would be to opt for running the Remote Tools as a service. You can use any account you want though running it as the Local System should be fine for most applications.
Note that there is an option for the Remote Debugger and the Remote
Debugger Configuration Wizard. You want the Wizard to set it up as a service.
Check the box to run as a Service. Leave the User name as
LocalSystem or enter the User Credentials you want the
service to run as.
Once you’ve configured the Remote Tools to run as a Service; your server is ready for Cloud Development. If you open your Visual Studio Project simply right click the Project and select Publish.